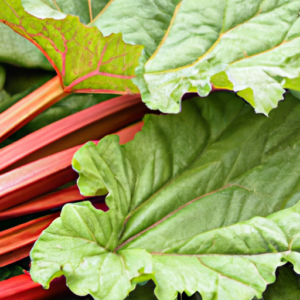
Are you interested in growing your own rhubarb? Look no further! This article will provide you with all the information you need to successfully grow rhubarb in your own backyard. Whether you’re a seasoned gardener or a beginner, we’ve got you covered. From choosing the right location to caring for your plants, we’ll guide you through the step-by-step process of cultivating delicious rhubarb. Get ready to enjoy the sweet and tangy flavors of homegrown rhubarb in your favorite recipes!

Choosing a Location
Sun Requirements
When choosing a location to grow rhubarb, it is important to consider the sun requirements. Rhubarb plants thrive in full sun, so selecting a spot in your garden that receives at least six to eight hours of direct sunlight is ideal. Adequate sunlight will help the plants develop strong and healthy stalks, ensuring a bountiful harvest.
Soil Requirements
Another crucial factor to consider when choosing a location for growing rhubarb is the soil conditions. Rhubarb plants prefer well-draining soil that is rich in organic matter. Before planting, make sure to test the soil’s pH level as rhubarb prefers a slightly acidic to neutral pH range of 5.0-7.0. If necessary, you can adjust the pH by adding amendments to the soil.
Drainage Considerations
In addition to soil requirements, it is important to consider drainage when selecting a location for your rhubarb patch. Rhubarb plants dislike standing water, so it’s essential to choose an area with good drainage. Avoid low-lying areas or spots that are prone to waterlogging, as excessive moisture can lead to root rot and other fungal diseases.
Preparing the Soil
Clearing the Area
Before planting rhubarb, it is essential to prepare the soil properly. Begin by clearing the area of any weeds, rocks, or debris. Rhubarb plants are heavy feeders, so it’s crucial to minimize competition for nutrients by ensuring a clean planting bed.
Adding Organic Matter
To provide your rhubarb plants with the best possible growing environment, it is recommended to add organic matter to the soil. Organic matter, such as compost or well-rotted manure, improves soil fertility and structure. Spread a layer of organic matter over the planting area and incorporate it into the soil, ensuring it is evenly mixed.
Soil Testing
Before planting rhubarb, it is advisable to conduct a soil test. A soil test can provide valuable insights into the nutrient levels and pH of your soil, allowing you to make any necessary amendments. Soil testing kits are widely available, and many agricultural extension offices provide soil testing services at a nominal fee.
pH Adjustment
Based on the results of your soil test, you may need to adjust the pH of your soil. Rhubarb prefers a slightly acidic to neutral pH range of 5.0-7.0. If your soil’s pH is too low (acidic), you can raise it by adding agricultural lime. Conversely, if the pH is too high (alkaline), you can lower it by adding organic matter high in acidity, such as peat moss.
Planting Rhubarb
Planting Time
The ideal time to plant rhubarb is in early spring when the soil has thawed and is workable. However, if you missed the spring planting window, you can also plant rhubarb in the fall. Just make sure to allow enough time for the plants to establish before the first frost.
Planting Depth
When planting rhubarb, it is important to ensure the crown is placed at the appropriate depth. The crown is the thick, bulb-like structure from which the leaves and stalks emerge. Plant the crown at a depth of about 2-4 inches below the soil surface. Planting too deep or too shallow can lead to poor growth or susceptibility to diseases.
Plant Spacing
To give your rhubarb plants enough room to spread and thrive, it is crucial to consider proper plant spacing. Space the plants at least 3-4 feet apart to allow for adequate airflow and to prevent overcrowding. Overcrowded plants can lead to increased moisture retention and a higher risk of diseases.
Watering
After planting, it is important to water the rhubarb plants thoroughly. This initial watering helps settle the soil and ensures good root-to-soil contact. Throughout the growing season, monitor the soil moisture and water the plants regularly, especially during dry spells. Rhubarb plants require consistent moisture, but be cautious not to overwater as it can lead to root rot.

Mulching and Fertilizing
Mulching Benefits
Mulching around rhubarb plants provides numerous benefits. It helps suppress weed growth, which reduces competition for nutrients and moisture. Additionally, mulch helps regulate soil temperature, conserves moisture, and prevents erosion. Over time, it also enriches the soil as it breaks down.
Choosing the Right Mulch
When selecting a mulch for your rhubarb patch, it is important to choose the right material. Organic mulches, such as straw, shredded leaves, or compost, are excellent choices. Apply a layer of mulch around the plants, taking care not to cover the crown, as this can lead to rotting. Mulching in the winter also helps protect the plants from extreme temperature fluctuations.
Fertilizer Requirements
Rhubarb plants are known for being heavy feeders, so it is essential to provide them with adequate nutrients. Before planting, incorporate a balanced organic fertilizer into the soil. Additionally, in early spring, side dress the plants with a high-nitrogen fertilizer to promote healthy growth. Regularly monitor the plants for signs of nutrient deficiencies and make appropriate adjustments.
Watering and Irrigation
Watering Frequency
Proper watering is essential for the growth and development of rhubarb plants. During periods of active growth, water regularly, aiming to provide about 1-2 inches of water per week. However, it’s important to strike a balance and avoid overwatering, as it can lead to root rot. Monitor the moisture levels in the soil, and adjust your watering schedule accordingly.
Irrigation Systems
To ensure consistent and efficient watering, consider installing an irrigation system in your rhubarb patch. Drip irrigation or soaker hoses are excellent options that deliver water directly to the plants’ root zone, minimizing water loss through evaporation or runoff. An irrigation system also allows you to automate the watering process, ensuring your plants receive a consistent supply of moisture.
Controlling Weeds
Mulching
Mulching is an effective strategy for controlling weeds in your rhubarb patch. Applying a layer of organic mulch around the plants helps suppress weed growth by blocking sunlight and preventing weed seeds from germinating. Ensure the mulch layer is thick enough to inhibit weed growth but avoid piling it against the rhubarb stalks to prevent excessive moisture retention.
Hand Weeding
Regular hand weeding is essential to keep your rhubarb patch free from persistent weeds. Spend some time each week inspecting the planting bed and remove any weeds that may have sprouted. Be careful when weeding near rhubarb plants, as their shallow root system can be easily damaged. Be diligent in removing weeds before they have a chance to establish and compete with your rhubarb.
Use of Herbicides
While it is always preferable to use natural methods for weed control, there may be instances where herbicides are necessary. If the weed infestation becomes overwhelming, you can consider using a selective herbicide specifically labeled for use on rhubarb. Always follow the manufacturer’s instructions and exercise caution when using any chemical products.
Managing Pests
Common Rhubarb Pests
While rhubarb plants are relatively resistant to pests, there are a few common ones to watch out for. Aphids, snails, slugs, and flea beetles can occasionally infest rhubarb leaves, causing damage or stunted growth. Furthermore, rhubarb curculio and rhubarb crown borer can pose significant threats to the plants if left unattended.
Organic Pest Control Methods
When it comes to managing pests in your rhubarb patch, employing organic pest control methods is often the safest and most environmentally friendly approach. Introducing beneficial insects, such as ladybugs or lacewings, can help control aphid populations. You can also handpick snails and slugs and create physical barriers, like copper tape or diatomaceous earth, to deter them.
Chemical Pest Control
If organic pest control methods prove ineffective, and the pest infestation becomes severe, you may need to consider chemical pest control options. However, it is important to exercise caution and only use pesticides specifically labeled for use on rhubarb. Follow the instructions provided by the manufacturer, adhere to safety precautions, and apply the pesticide judiciously.
Harvesting Rhubarb
First Year Harvesting
To ensure the long-term health and productivity of your rhubarb, it’s recommended to refrain from harvesting during the first year after planting. Instead, allow the plants to establish a strong root system and focus their energy on growth. By practicing patience, you will be rewarded with more abundant harvests in the following years.
Subsequent Year Harvesting
Once the rhubarb plants have established themselves, you can start harvesting in the second year. Harvesting should occur in early to mid-spring, when the stalks are firm and have a vibrant color. To harvest, firmly hold the stalk near the base and gently pull it away from the crown. Avoid twisting the stalk, as it can damage the plant.
Harvesting Techniques
When harvesting rhubarb, it is essential to employ proper techniques to maximize yield and plant health. Never remove more than one-third of the stalks at any given time, as this can weaken the plant. Instead, selectively harvest the largest and healthiest stalks. If any stalks appear thin or weak, it is advisable to leave them untouched to allow for further growth.
Dividing and Propagating
Dividing Established Plants
As rhubarb plants age and become overcrowded, their productivity may decline. To rejuvenate the plants and maintain optimal growth, it is necessary to divide the established rhubarb. Dividing should be done in early spring or fall, while the plants are dormant. Carefully dig up the clump, separate the crowns, and replant them, ensuring each division has viable buds and roots.
Rhizome Propagation
In addition to dividing established plants, rhubarb can also be propagated through rhizomes. For rhizome propagation, select a healthy, mature plant and dig up the rhizomes during the dormant season. Cut the rhizomes into sections, ensuring each section has at least one dormant bud and a portion of the root system. Plant the rhizomes in a prepared bed, and with time, new rhubarb plants will emerge.
Winter Care
Protective Coverings
During the winter months, it is essential to protect your rhubarb plants from extreme temperatures and frost. Once the plants have gone dormant, apply a layer of mulch around the base of the plant to insulate the crown and prevent freeze-thaw cycles. Straw or shredded leaves are excellent choices for protective coverings.
Cutting Back
In late fall or early winter, after the first frost or when the leaves have withered and turned brown, it’s time to cut back the rhubarb stalks. Use sharp pruning shears or a clean knife to remove the stalks at ground level. Removing the old stalks helps prevent disease and pests from overwintering in the decaying plant material.
Fall Cleanup
Before winter sets in, it is important to conduct a thorough fall cleanup in your rhubarb patch. Remove any dead or decaying foliage, stalks, or debris from the garden bed. This practice helps minimize the risk of diseases and pests and prepares the plants for a healthy and vigorous growth in the following season.
Growing rhubarb can be a rewarding experience, but it requires careful consideration of various factors. By choosing the right location, preparing the soil, and following proper planting and care techniques, you can cultivate healthy rhubarb plants that provide a bountiful harvest for many years to come. Remember to monitor for pests and diseases, employ organic methods whenever possible, and enjoy the delicious and versatile stalks that rhubarb has to offer. Happy growing!


